
Ancient Callouts in CS2
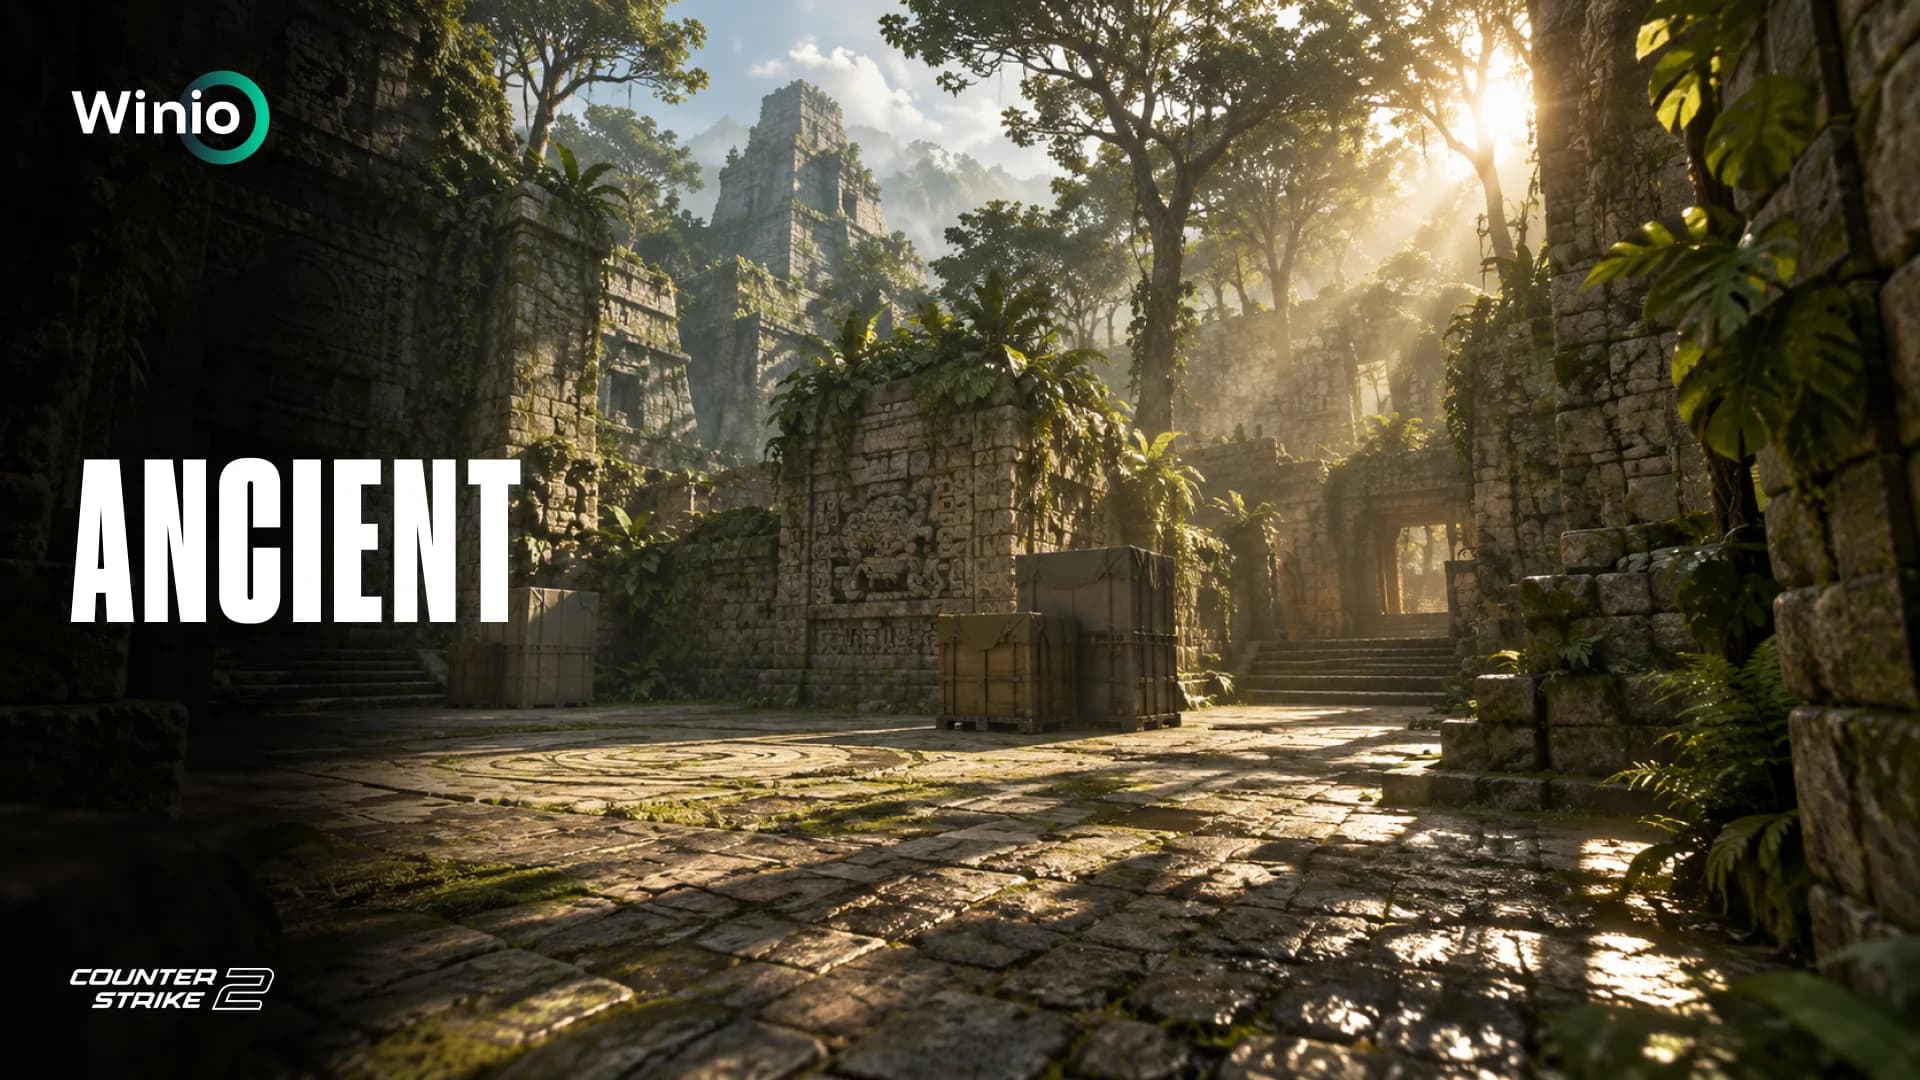
Ancient is one of the most utility-dependent maps in CS2.
Narrow entrances, sharp corners and fast rotation routes make every piece of map control valuable. A team can have excellent aim and still lose because it gave up Mid, failed to clear Cave or entered a bombsite without isolating the defensive positions.
Clear communication is especially important. A call such as “one on B” provides very little information. “One behind Pillar, another rotating through Cave” immediately tells the team which angles to clear and where the next opponent may appear.
This guide covers the essential Ancient callouts, the history of the map, CT and T-side strategies, useful grenades and the areas that influence most rounds.
The History of Ancient
Ancient was introduced to CS in December 2020 as part of Operation Broken Fang.
Its jungle environment, stone temples and archaeological ruins immediately separated it from the urban and industrial settings of most Counter-Strike maps.
Who wins?
All MatchesFree Today United21 Season 55
Tomorrow 13:30
 Elite Klan VELLAMOEternal Fire Academy
 Free for everyone · factor breakdown
Prediction: Elite Klan VELLAMO
73%27%United21 Season 55
Tomorrow 11:00
 GatorianTeletubisie
Prediction: Teletubisie
32%68%

The community quickly began comparing Ancient with Aztec. Both maps use a Mesoamerican-inspired setting, and several internal references discovered in the game files strengthened the idea that Ancient was a spiritual successor to the classic map.
Valve never officially presented Ancient as Aztec 2, but the connection became part of the map’s identity.
In May 2021, Ancient entered the Active Duty map pool and replaced Train. It later moved to CS2 with updated lighting, materials and visibility while preserving its general layout.
Ancient has developed significantly since its introduction. Early versions strongly favored the CT side, but multiple adjustments to the entrances, Mid and bombsites made the map more balanced and created additional options for Terrorists.
Why Ancient Callouts Matter
Ancient contains many narrow corridors and overlapping rotation routes.
A player spotted in Mid can move toward Donut, return through Red Room or support a B attack within seconds. A vague call may cause the defense to rotate too early and leave an entire bombsite exposed.
Accurate callouts help a team:
- Coordinate utility
- Build crossfires
- Clear positions in the correct order
- Track rotations
- Prepare trades
- Choose the safest plant
- Organize retakes
Callout names can vary between regions and teams. Positions such as Heaven, Catwalk, Xbox and Sniper’s Nest may have alternative names in different lobbies. The most important rule is to make sure everyone on the team uses the same terminology.
Ancient A Site Callouts
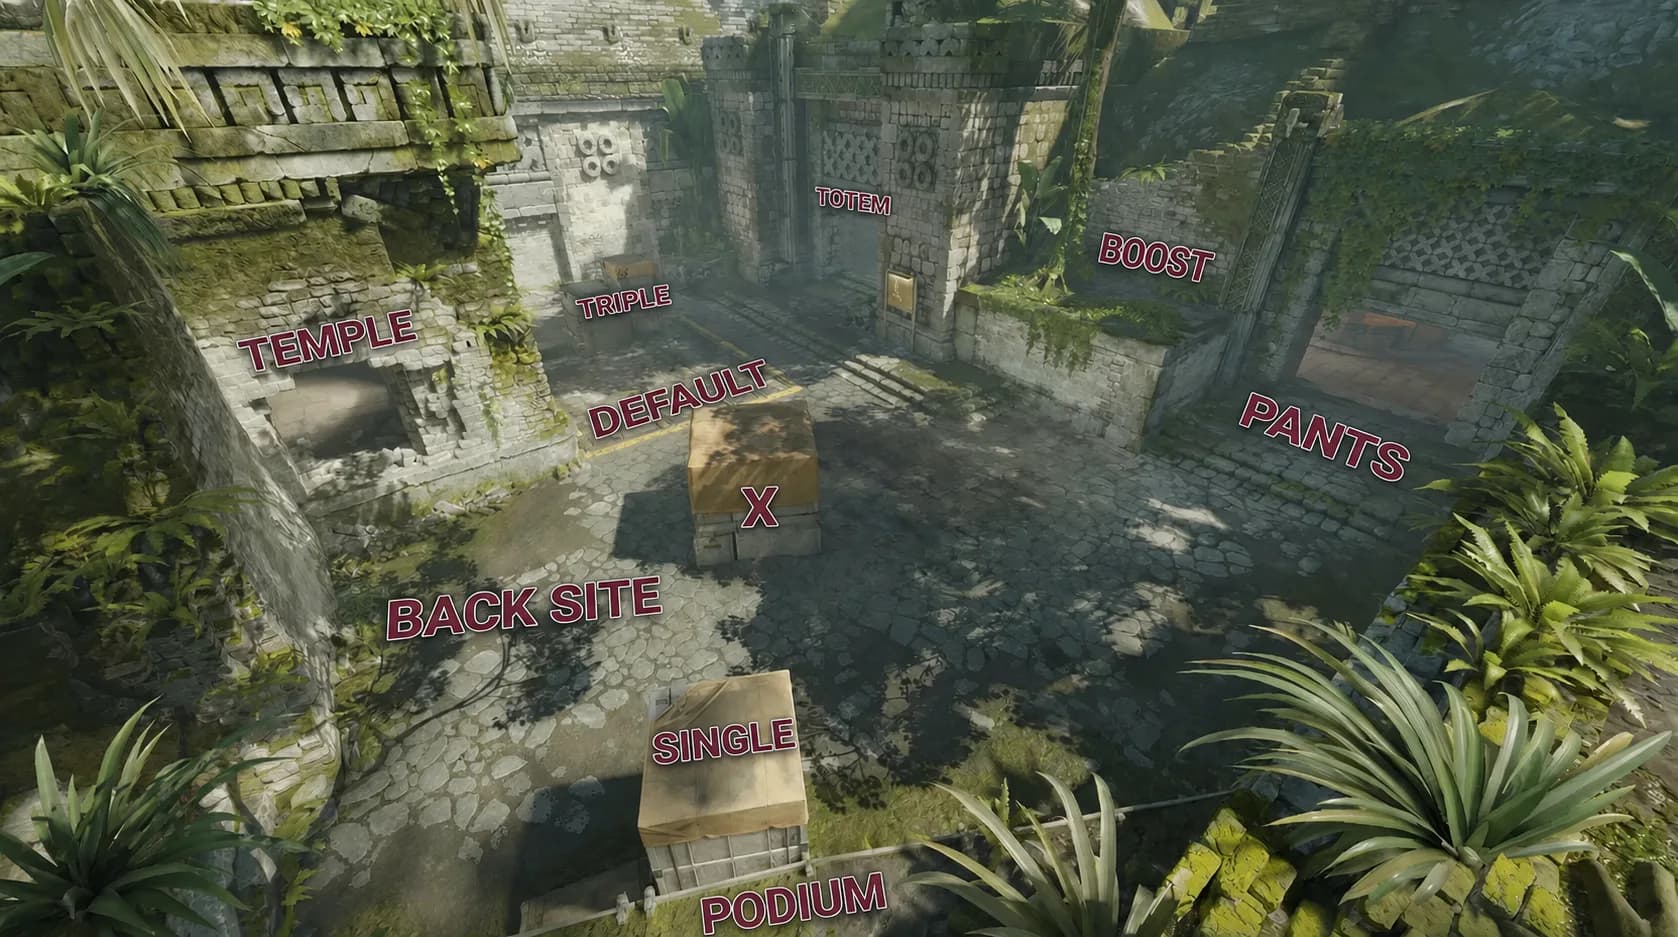
A is reached primarily through A Main and Donut.
The entrances are narrow, but the site itself contains several boxes, elevated positions and long post-plant sightlines. Terrorists usually need utility to isolate Temple, Donut and the defenders playing behind the site boxes.
The essential A site callouts are:
- A Site
- A Main
- Donut
- Temple
- Default
- Triple
- Big Box
- Single
- Boost
- Plat
- Back Site
- CT
- Short
- Long
- Ninja
A Main
A Main is the primary T-side entrance to the bombsite.
Its narrow exit makes dry peeks dangerous. A defender can watch the entrance from Temple, Triple, Default or other positions across the site.
Terrorists normally use flashes and smokes before leaving A Main. Entry players should move together so the second player can trade immediately.
Donut
Donut is the circular room connecting Mid with A.
Control of Donut creates a second entrance to the bombsite and prevents the defenders from focusing entirely on A Main. It is one of the most important positions on Ancient because it also provides a fast rotation route.
A player inside Donut can pressure the site, cut CT rotations or remain hidden until the main execute begins.
Temple
Temple connects CT Spawn with the back of A.
It is a strong defensive and retake position because it provides cover and a direct sightline onto the bombsite. A smoke in front of Temple can isolate the site defenders and delay rotations.
Terrorists should still watch for defenders pushing through the smoke or using utility from behind it.
Default
Default is the most common planting position on A.
The exact plant should depend on which areas the attacking team controls. A safe plant may protect the planter from Temple but leave the bomb difficult to defend from A Main.
Teams should decide whether they want a safe plant or an open plant visible from their post-plant positions.
Triple
Triple refers to the group of stacked boxes on the site.
It provides strong cover against A Main and Donut, making it a common position for anchors. Molotovs and HE grenades can force a defender away from the boxes before the entry players expose themselves.
Big Box
Big Box is one of the main pieces of cover inside A.
A player can use it to avoid long sightlines and take separate fights against the two entrances. Attackers should avoid assuming the site is clear after checking only Default and Triple.
Single
Single is the smaller box close to the plant area.
It can hide a defender during a fast execute and creates an unexpected close-range angle. The position is less effective once the attackers have control of both A Main and Donut.
Boost
Boost is an elevated position that provides an unusual angle onto the approaching Terrorists.
It is most effective when used occasionally. Repeating the same setup makes it easy for the attackers to prefire or remove the player with utility.
Plat
Plat is the raised section near the edge of A.
It provides additional cover and can be used during both the initial defense and the post-plant. Players entering the site should clear it without exposing themselves to Temple at the same time.
Back Site
Back Site describes the area behind the main plant zone and boxes.
A defender here can delay the execute and wait for support instead of taking the first duel. It is also a common position during retakes because it provides cover from A Main.
Ancient B Site Callouts
B can be attacked through Ramp and House, with Cave and the connecting routes influencing how safely both teams can move around the area.
The site contains several pieces of cover that allow defenders to survive the initial utility and take close-range fights.
The main B site callouts are:
- B Site
- Ramp
- B Main
- Cave
- House
- Pillar
- Default
- Square
- Lane
- Dark
- Back Site
- Cubby
- Corner
- Alley
- CT
- Back Halls
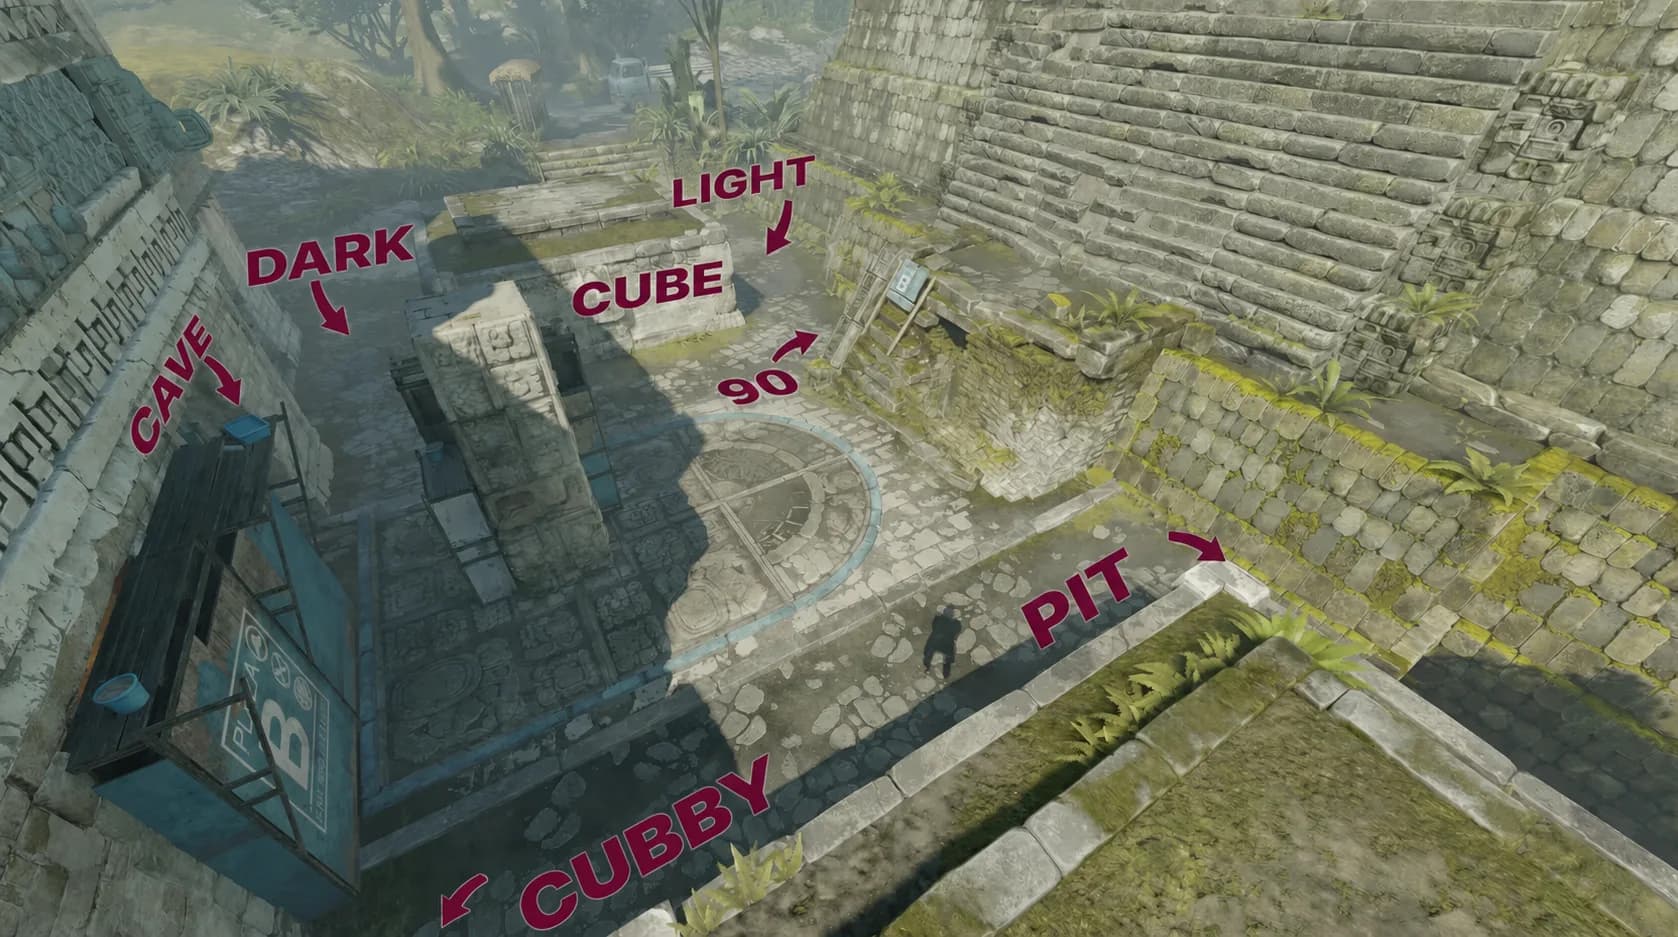
Ramp
Ramp is the main T-side approach to B.
Fast B attacks often begin here because the Terrorists can reach it quickly. However, a well-timed CT Molotov or HE grenade can stop the rush before it develops.
After taking Ramp, the attacking team can continue toward the site or use the pressure to force rotations before changing direction.
Cave
Cave is one of the most contested positions around B.
Control of this area allows defenders to collect information and support the bombsite. For Terrorists, removing the Cave player reduces the number of angles that must be cleared during the execute.
Early Cave fights should involve utility and trading. A solo player entering without a flash can be eliminated before the team has any opportunity to respond.
House
House provides another route into B and is especially valuable during split attacks.
When one group enters through Ramp and another pressures House, the defenders must watch multiple directions. The two groups need to arrive together. If one enters too early, the CT side can isolate each part of the attack.
Pillar
Pillar is the central piece of cover on B.
It is one of the strongest defensive positions because a player can move around it and repeatedly change the angle of the fight. Attackers should clear both sides together rather than chasing the defender individually.
Pillar is also an important reference point for planting and post-plant utility.
Default
Default is the standard planting area on B.
It usually provides protection during the plant, but the bomb may become difficult to defend if the Terrorists lose control of Ramp and House.
An open plant can be stronger when the attackers control the deeper parts of the site.
Square
Square is the large block near the back of B.
It divides the bombsite and gives defenders another place to avoid the initial flashes. Attackers should check both sides before assuming the back of the site is clear.
Lane
Lane is the long approach leading toward B.
Controlling it gives the Terrorists space to prepare utility and pressure the defenders. CT players can contest Lane early, but they need a clear escape route if the attacking team uses multiple grenades.
Dark
Dark is a concealed position near the B approach.
It is easy to overlook during a fast execute. A Molotov, HE grenade or coordinated double peek is safer than allowing the first entry player to clear it alone.
Back Site
Back Site provides cover from the initial Ramp pressure.
A defender can play for time and wait for teammates rotating through CT or Back Halls. Terrorists need to clear it before planting because a hidden player can disrupt the entire post-plant setup.
Cubby
Cubby is a small recessed position near the site entrance.
It is dangerous during fast rounds because the entry player may focus on Pillar and overlook the close corner. Teams should include Cubby in their standard clearing order.
Ancient Mid Callouts
Mid is the strategic center of Ancient.
Control of this area opens access to Donut, limits CT information and makes both bombsites more difficult to defend. A team that loses Mid often has to surrender space and rely on late reactions.
The essential Mid callouts are:
- Mid
- Lower Mid
- Top Mid
- Elbow
- Window
- Sniper’s Nest
- Red Room
- Donut
- Xbox
- Heaven
- Pit
- Tunnels
- Connector
- Cubby
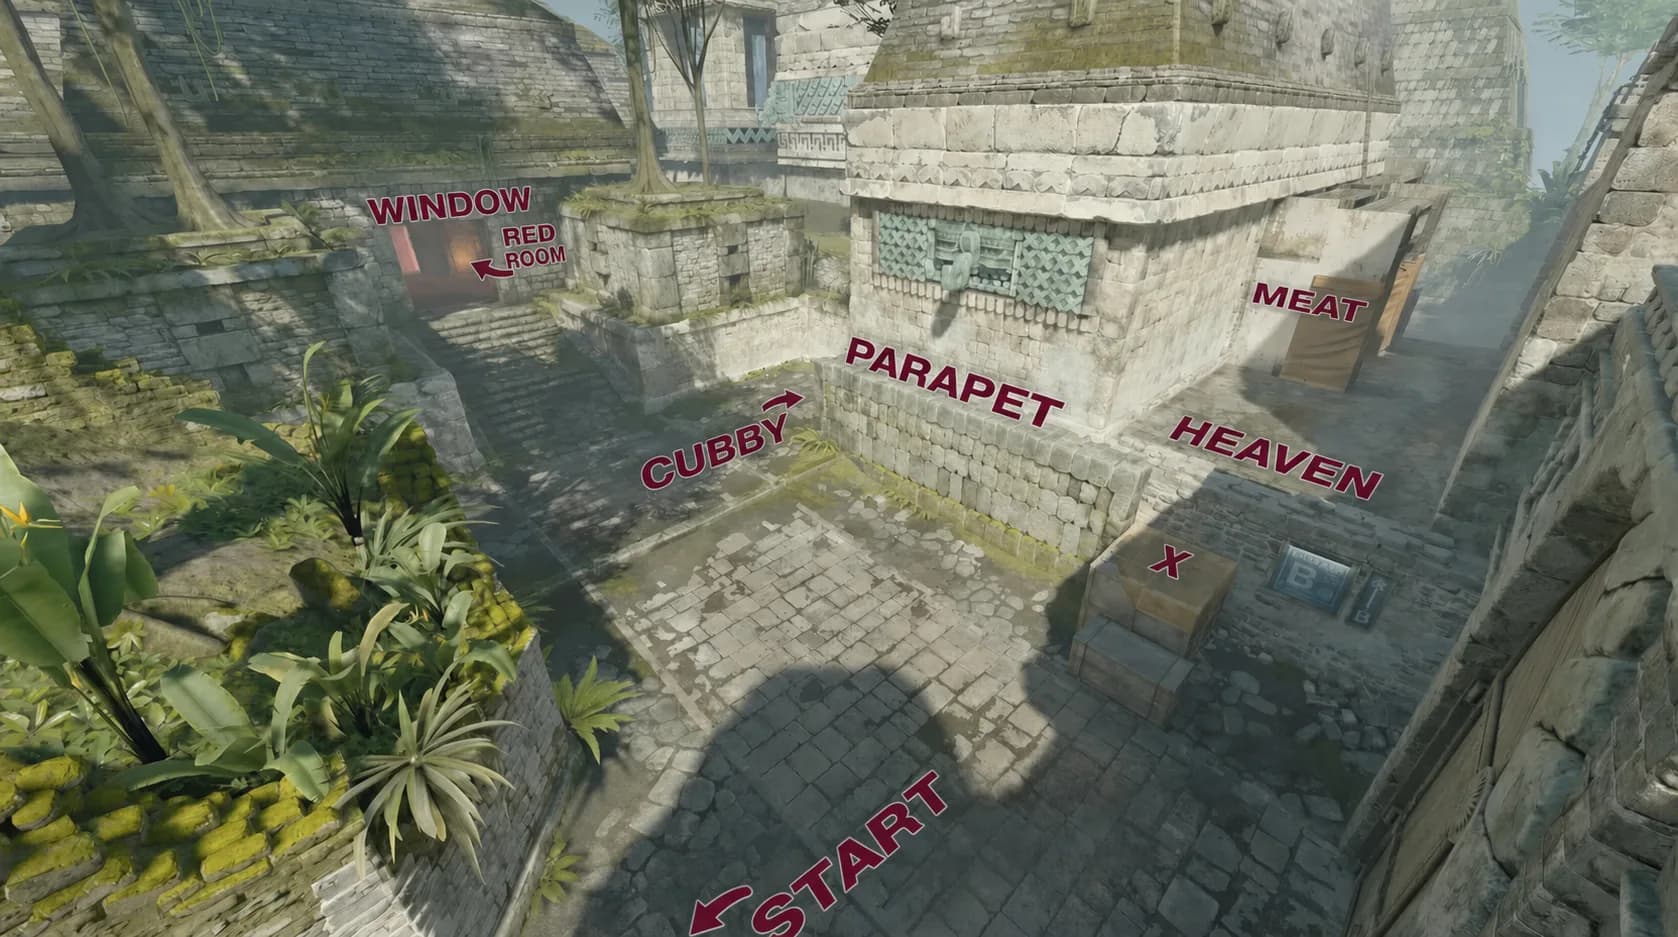
Mid
Mid is the central open area connecting several important routes.
Terrorists use it to create an A split through Donut, threaten defensive rotations and keep the CT side uncertain. CT players contest it with AWP angles, utility and occasional aggression.
Winning Mid does not guarantee the round, but it greatly increases the number of available attacking options.
Elbow
Elbow is the curved T-side approach into Mid.
It is a narrow choke point that can be blocked with a smoke, Molotov or HE grenade. Terrorists should use flashes before exposing multiple players to the defensive angles.
Window
Window is a defensive position overlooking Mid.
It provides information and creates an early duel against players leaving Elbow. Once Window is smoked, the defender must choose whether to remain nearby, reposition or give up the area.
Sniper’s Nest
Sniper’s Nest is one of the main defensive positions for watching Mid.
The elevation and cover make it useful for AWP players. However, predictable positioning can be punished with smokes, Molotovs and pre-aimed peeks.
Red Room
Red Room is an important connection on the T side of Mid.
It allows players to move between different parts of the map without immediately revealing the final attack. It can also be used to regroup after the initial Mid utility has been exchanged.
Donut
Donut connects Mid with A and is the main reward for gaining central control.
A Terrorist inside Donut can attack A from the side, stop rotations or create a late lurk. Defenders should communicate immediately when Donut is lost because the A anchors may become exposed to two directions.
Xbox
Xbox refers to the boxes located around Mid.
They can be used for cover, movement and boosted angles. Players should be aware that an opponent may appear at a different elevation than expected.
Heaven
Heaven is an elevated route near Mid.
It provides another way to influence the central fight and connects with nearby T-side areas. The position may also be called Catwalk in some teams.
Pit
Pit is the lower recessed position around Mid.
A CT player can use it to surprise Terrorists leaving Elbow, but the position becomes vulnerable to Molotovs and coordinated clearing.
Top Mid
Top Mid is the deeper section of Mid closer to the CT positions.
Reaching it gives the Terrorists access to Donut and creates pressure on defensive rotations. The CT side should avoid fighting alone once the attackers have crossed into this area.
Important Connections on Ancient
Understanding individual positions is useful, but Ancient is decided by the routes connecting them.
Donut
Donut connects Mid with A.
Losing it forces the A defenders to watch A Main and the side entrance simultaneously. It also gives the Terrorists a position from which they can interrupt rotations.
Cave
Cave connects the central part of the map with B.
It is valuable for information, early fights and rotations. A team controlling Cave can place more pressure on the B anchors without committing the bomb.
Red Room
Red Room allows the Terrorists to move between routes while hiding the final direction of the round.
It is particularly useful during slower defaults when the team wants to maintain pressure on more than one area.
CT Spawn
CT Spawn connects both bombsites and acts as the main defensive rotation route.
Terrorists can isolate it with smoke during an execute. Once the smoke disappears, the post-plant players must be ready for a coordinated retake.
Back Halls
Back Halls connects the defensive side of B with the surrounding rotation routes.
It allows CT players to support the site or approach from behind during a retake. Attackers should track this route after the bomb has been planted.
Teams to Study on Ancient
Team Spirit, FURIA, MOUZ, 9z and Legacy can provide useful recent examples of high-level Ancient play.
Their matches can help players study:
- Early Mid protocols
- Cave control
- Donut pressure
- Coordinated B executes
- A splits through two entrances
- Utility timing
- Post-plant positioning
- Defensive rotations
AWP players should focus on how professionals approach Sniper’s Nest, Mid and Temple without becoming predictable.
Riflers can study the spacing between entry players and traders. Ancient contains many narrow entrances, so the distance between teammates often determines whether an opening death can be traded.
How to Play Ancient on the CT Side
Ancient defense is based on information, utility and controlled aggression.
The CT side should not give up Mid, Cave and Donut without understanding where the Terrorists are moving. At the same time, unnecessary pushes can create gaps that the attackers immediately exploit.
Contest Mid Early
Mid is the most influential area on the map.
CT players can delay the Terrorists with smokes, Molotovs and HE grenades before taking a duel from Window, Sniper’s Nest or another supported position.
The goal is not always to find the opening kill. Early utility can:
- Delay Mid control
- Force the Terrorists to spend grenades
- Reveal the number of attackers
- Protect Donut
- Create time for rotations
- Limit possible splits
If the defense gives up Mid, the A players must prepare for Donut pressure and the B defenders should watch for changes in the attacking setup.
Fight for Cave With Support
Cave control provides valuable information around B.
A supported CT player can contest the area with utility and then fall back before becoming trapped. Pushing too deeply without support often gives the Terrorists a free opening kill.
Teams should vary their Cave approach. Constant aggression becomes predictable, while never contesting it allows the attackers to prepare B executes without pressure.
Build Crossfires on A
A Main and Donut should be covered by positions that allow immediate trades.
One player can hold the main entrance while another watches Donut or plays from Temple. The defenders should avoid exposing themselves to both entrances simultaneously.
Once Donut is lost, isolated positions become much weaker. The A players may need to retreat, use utility and wait for the retake.
Delay B Instead of Forcing Every Duel
The B defenders do not always need to stop the entire attack alone.
A Molotov at Ramp, a smoke near the entrance or a flash above the site can delay the execute long enough for support to arrive. Pillar and Back Site allow defenders to survive and take later fights.
Staying alive can be more valuable than finding one kill and immediately being traded.
Communicate Lost Areas
A useful defensive call should include:
- Number of opponents spotted
- Direction of movement
- Bomb location, if known
- Utility used
- Areas no longer controlled
- Whether immediate support is required
“Three Ramp, bomb spotted, Cave lost” allows the team to react much faster than simply calling “B.”
How to Play Ancient on the T Side
Ancient rewards structured map control.
Fast attacks can work, but repeating the same rush allows the defense to prepare early utility and close-range setups. A strong T side forces the CTs to spend grenades before choosing the final bombsite.
Establish Mid Control
Mid creates options for both bombsites.
A standard take can use a smoke for Window or Sniper’s Nest, a Molotov for Pit and flashes above the central area. The first players should enter with enough spacing to trade.
After winning Mid, the Terrorists can:
- Enter Donut
- Split A
- Pressure defensive rotations
- Hold CT aggression
- Return toward B
- Keep a lurker in the center of the map
The team does not need to commit immediately. Simply holding Mid limits the defense.
Pressure Cave
Cave pressure forces the B defenders to reveal their setup or use utility.
Even if the final plan is an A execute, showing presence near Cave can keep additional CT players around B. This creates more space for the A group.
Players should avoid entering Cave one at a time. A flash and a coordinated peek provide a much better chance of trading the defender.
Clear A Main Methodically
A Main leads into several defensive sightlines.
Before entering, the team should identify which positions are blocked by smokes and which must be cleared manually. Flashes should arrive before the entry players expose themselves.
The attackers should also coordinate with the Donut group. If one entrance activates too early, the CT side can focus on it before turning toward the second group.
Track Defensive Utility
Ancient rounds are often decided by grenade economy.
If the defenders have already used their Mid smoke, Cave Molotov and site flashes, the final execute becomes much easier. Players should communicate which grenades have been used and when the smokes will disappear.
Waiting several seconds can be better than attacking into the strongest part of the defensive setup.
Prepare the Post-Plant Before Planting
The safest plant is not always the strongest plant.
The bomb should be positioned for the areas the Terrorists expect to control after the execute. A plant visible from A Main or Ramp may be more valuable than one that only protects the planter.
Essential Utility on Ancient
Ancient’s narrow entrances make grenades essential.
Smokes remove long sightlines, Molotovs clear protected corners and flashes allow players to cross choke points without taking completely unfavorable duels.
Utility for A Site
A standard A execute can include:
- Temple smoke
- Donut smoke
- CT smoke
- Molotov for Triple
- Molotov for Default or Back Site
- Flashes above A Main
- HE grenades for common box positions
The exact setup depends on whether the team is attacking only through A Main or splitting the site through Donut.
The objective is to separate the defenders. Terrorists want to fight the site anchor, Temple player and Donut defender individually instead of facing a complete crossfire.
Utility for Mid Control
A basic Mid take can use:
- Window or Sniper’s Nest smoke
- Donut smoke
- Molotov for Pit
- Molotov for close Elbow positions
- Flashes above Mid
- HE grenades for defensive utility positions
Timing matters. Throwing every grenade too early may allow the CT side to wait for the utility to expire and retake the area.
Utility for B Site
A B execute can include:
- CT smoke
- Cave smoke or Molotov
- Molotov for Pillar
- Molotov for Dark
- Molotov for Back Site
- Flashes above Ramp
- HE grenades for Cubby and common anchor positions
The entry players should know which angles remain open after the utility lands. Smokes do not clear the site by themselves, and defenders can still push through them.
Effective T-Side Strategies
Mid Control Into an A Split
The Terrorists take Mid and establish control near Donut.
One group remains in A Main while another enters through Donut. The two groups attack together after the utility isolates Temple and the back of the site.
This split is powerful because the defenders cannot focus on a single narrow entrance.
Slow A Execute
The team pressures Mid and B before regrouping near A Main.
After the CT side has used part of its utility, the Terrorists smoke Temple and Donut, clear the close positions with Molotovs and enter behind coordinated flashes.
The execute becomes stronger if the defense has already rotated a player away from A.
Fast B Execute
The attacking team uses early utility to block the defensive sightlines and enters through Ramp before the CT side establishes a full setup.
Flashes should land before the first player reaches the site. Pillar, Dark and Cubby must be cleared immediately.
The speed is valuable only when the utility is coordinated. A fast attack without grenades becomes a sequence of isolated duels.
B Split Through Ramp and House
One group pressures Ramp while another prepares to enter through House.
Both groups activate at the same time, forcing the B defenders to watch different directions. CT and Back Halls utility can delay the retake after the bomb is planted.
Mid Fake Into B
The Terrorists use enough utility and presence in Mid to force the CT side to protect Donut and A.
The bomb then moves toward B for a late execute. The fake works best when the team has already shown several real Mid-to-A rounds.
Effective CT-Side Strategies
Aggressive Mid Control
The CT side uses early grenades and multiple players to fight for Mid.
The objective is to stop the Terrorists before they establish Donut control. After the initial contact, one defender can fall back while another holds the information.
This setup requires a plan for A Main and B in case the attackers avoid Mid entirely.
Cave Aggression
Two defenders can use a flash and Molotov to contest Cave.
If no Terrorists are present, one player may collect additional information while the other returns to the bombsite. The push should stop if the attacking team responds with heavy utility.
Passive A Crossfire
The A defenders allow the Terrorists to approach before activating a crossfire from the boxes, Temple and the back of the site.
This setup can punish teams that enter without clearing positions properly. It becomes weaker if the attackers gain Donut and isolate Temple with smoke.
B Retake Setup
Instead of fighting to the death on B, the anchor delays the execute and remains alive near the back of the site.
The rotating players then arrive through CT, Cave or Back Halls for a coordinated retake. Saving utility for this moment is essential.
Common Mistakes on Ancient
Giving Up Mid Without Information
If the CT side loses Mid without knowing how many Terrorists are present, both bombsites become harder to read.
The defense must prepare for Donut pressure, lurkers and rapid changes of direction.
Entering Choke Points One at a Time
A Main, Ramp, Cave and Elbow are narrow.
Entering without proper spacing gives the defender several separate duels instead of one coordinated fight.
Ignoring Donut
Donut affects the A site and the main rotation routes.
A team that forgets about it can lose the bombsite from the side even after successfully stopping the A Main players.
Using All Utility Too Early
Throwing every grenade during the first 20 seconds leaves the team without tools for the final execute or retake.
Utility should have a purpose: take space, deny space, collect information or delay the opponent.
Planting Without Considering the Post-Plant
A safe plant may become impossible to defend once the attackers fall back.
The planter should communicate which areas the team controls before choosing the bomb position.
How to Play Ancient More Effectively
Learn the Main Routes First
New players should begin with the most important connections:
- A Main to A
- Mid to Donut
- Donut to A
- Ramp to B
- Cave to B
- CT Spawn to both sites
- Red Room to Mid
Understanding these routes makes the rest of the callouts easier to remember.
Use Specific Communication
A good call should describe the complete situation.
“One Pillar, bomb Ramp, CT smoke used” tells the team where the opponent is, where the bomb is located and which route may soon become available.
Define Entry and Trading Roles
Every execute should have a first player, a trader and teammates responsible for utility.
If everyone waits for someone else to enter, the defensive smokes will disappear and the execute will lose its timing.
Learn a Small Utility Set
You do not need every possible lineup immediately.
Start with:
- Temple smoke
- Donut smoke
- Mid Window smoke
- Pit Molotov
- Cave Molotov
- CT smoke for B
- Pillar Molotov
- Basic A and B flashes
A few reliable grenades are more valuable than dozens of lineups you cannot reproduce during a match.
Adapt to the Defense
If the CT side constantly fights for Mid, wait for its early utility and prepare a coordinated response.
If the defenders play passively, take space and force them into difficult retakes. Ancient rewards teams that recognize patterns instead of repeating the same plan.
Learn the Callouts, Then Read the Match
Learning the Ancient callouts improves communication. Understanding Mid control, Donut pressure, utility timing and rotations explains why each round develops in a particular way.
The same factors influence professional matches. A team’s performance on Ancient depends on its map pool, recent results, side-specific form, utility protocols and ability to convert control of Mid and Cave into successful executes.
Winio analyzes these variables across thousands of matches to show what the data says before the server decides the result.
Explore upcoming CS2 matches and data-driven predictions at Winio.