
Inferno Callouts in CS2
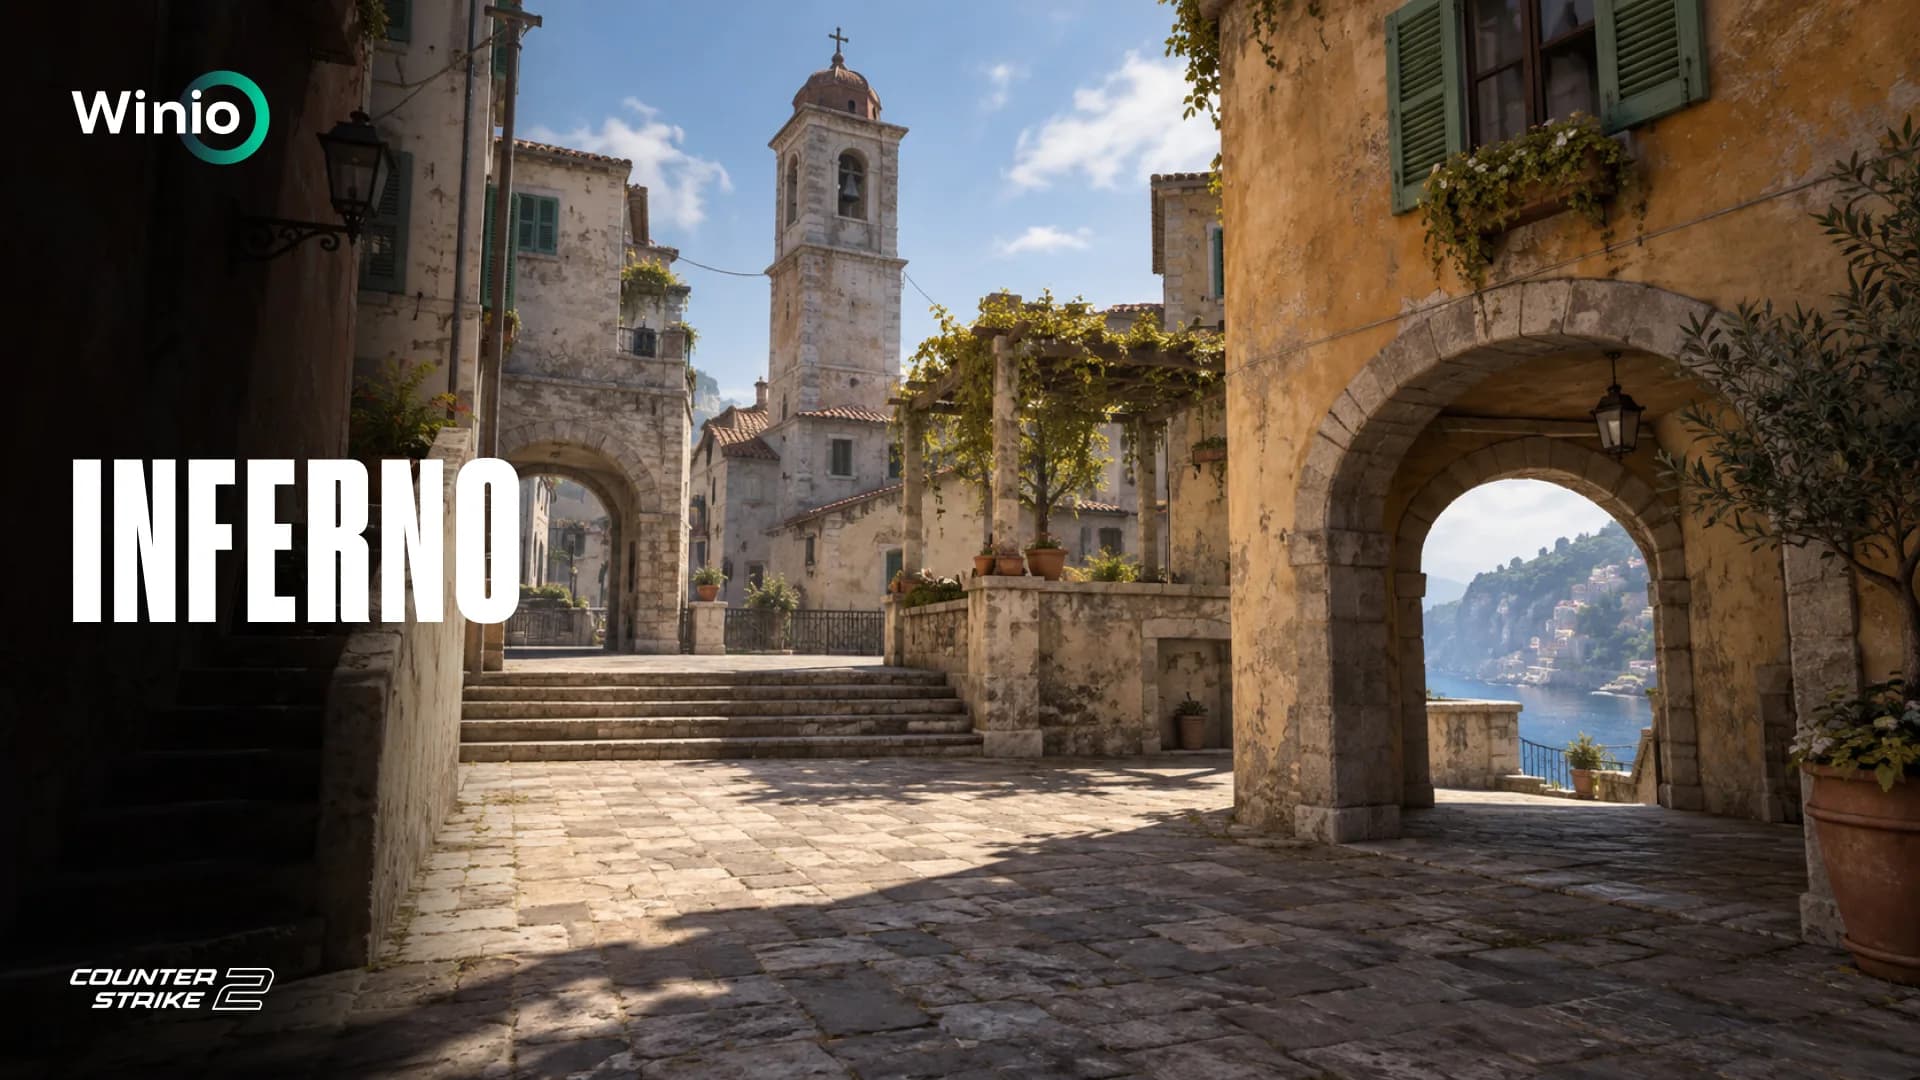
If you have never fought for Banana control, have you really played Counter-Strike?
Inferno rewards precise decisions. Utility cannot be wasted, rotations need to be timed correctly and every player must understand their role. CTs constantly move between A and B while trying to determine where the final execution will happen.
Raw aim can win individual duels, but discipline and communication usually decide the map.
This guide covers the essential Inferno callouts, the history of the map, basic CT and T-side strategies, useful utility and the mistakes players should avoid.
The History of Inferno
Inferno was created by Christopher “Narby” Auty and officially entered Counter-Strike with version 1.1 in 2001. It quickly became one of the game’s defining competitive maps.
The original version depicted a Middle Eastern village with the Terrorists attacking oil infrastructure. Counter-Strike: Source introduced a major visual update and moved the action to a European setting filled with narrow streets, balconies and traditional architecture.
Who wins?
All MatchesFree Today United21 Season 55
Tomorrow 13:30
 Elite Klan VELLAMOEternal Fire Academy
 Free for everyone · factor breakdown
Prediction: Elite Klan VELLAMO
73%27%United21 Season 55
Tomorrow 11:00
 GatorianTeletubisie
Prediction: Teletubisie
32%68%

Inferno received another substantial overhaul in CS in October 2016. Valve updated the visuals, lighting and several important areas while preserving the basic structure of the map.
CS2 continued this evolution. Some sections were widened or simplified, including parts of Banana, while the entire map became brighter and more visually detailed. Despite the changes, Inferno has retained its distinctive pacing and strategic identity.
Inferno A Site Callouts
Inferno’s A site contains several entrances, tight corners and positions with overlapping lines of sight. Terrorists can attack through Short, Long or Apartments, so accurate communication is essential.
The most common A site callouts include:
- A Short
- A Long
- Arch
- Library
- Moto
- Truck
- Porch
- Balcony
- Apartments
- Boiler
- Pit
- Mini Pit
- Graveyard
- Default
- Quad
- Close
- Dark
- A Site
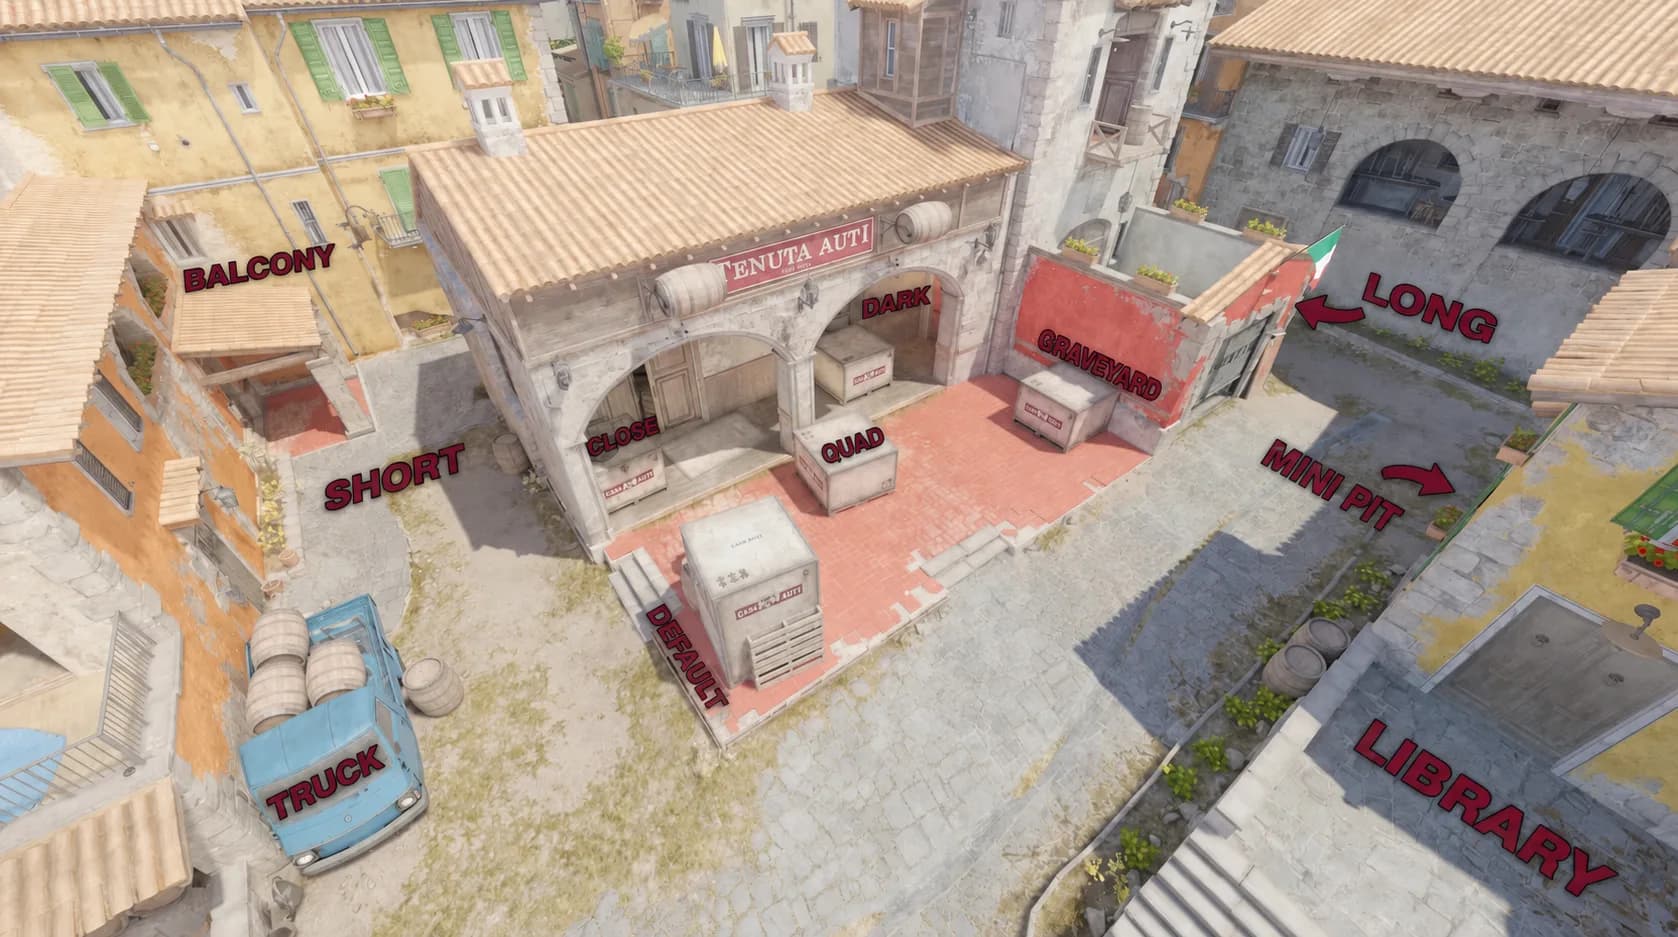
Some callouts vary between regions. For example, players may use Big Pit instead of Pit, Small Pit instead of Mini Pit or Long Hall instead of Apartments. The important thing is that everyone on the team understands the same terminology.
The Most Important A Positions
A Short is one of the main routes from Top Mid to the site. It creates direct pressure on Pit, Balcony and the front of A.
A Long leads toward Arch and Library. Taking Long gives the attacking team another angle onto the site and limits CT rotations.
Pit is one of the strongest defensive positions on Inferno. A player inside Pit can fight Short, Apartments and parts of the site while using the wall for cover.
Mini Pit offers a closer angle against Short. It can be powerful during an execute but becomes vulnerable once the attackers control Apartments and the site.
Graveyard sits behind the site and can be difficult to clear during a fast execute. Molotovs are often used to force the defender into the open.
Library is a key rotation and retake position. A defender arriving from B can use Library to support Long, Arch or the back of A.
Moto is a common defensive and retake angle near Library. A smoke in this area can isolate the site and prevent CT players from assisting Pit.
Balcony and Apartments allow Terrorists to attack Pit and the back of the site from above. Controlling these areas makes an A split much harder to defend.
Inferno B Site Callouts
B is one of the most difficult bombsites to retake in CS2. Its narrow entrance makes it easier to defend after the bomb is planted, but it also allows CT players to delay an execute with well-timed utility.
The main B site callouts are:
- Banana
- Logs
- Car
- Sandbags
- Half Wall
- B Entrance
- First Oranges
- Second Oranges
- New Box
- Boost
- Fountain
- Coffins
- Dark
- Construction
- Ruins
- CT
- Pool
- B Site
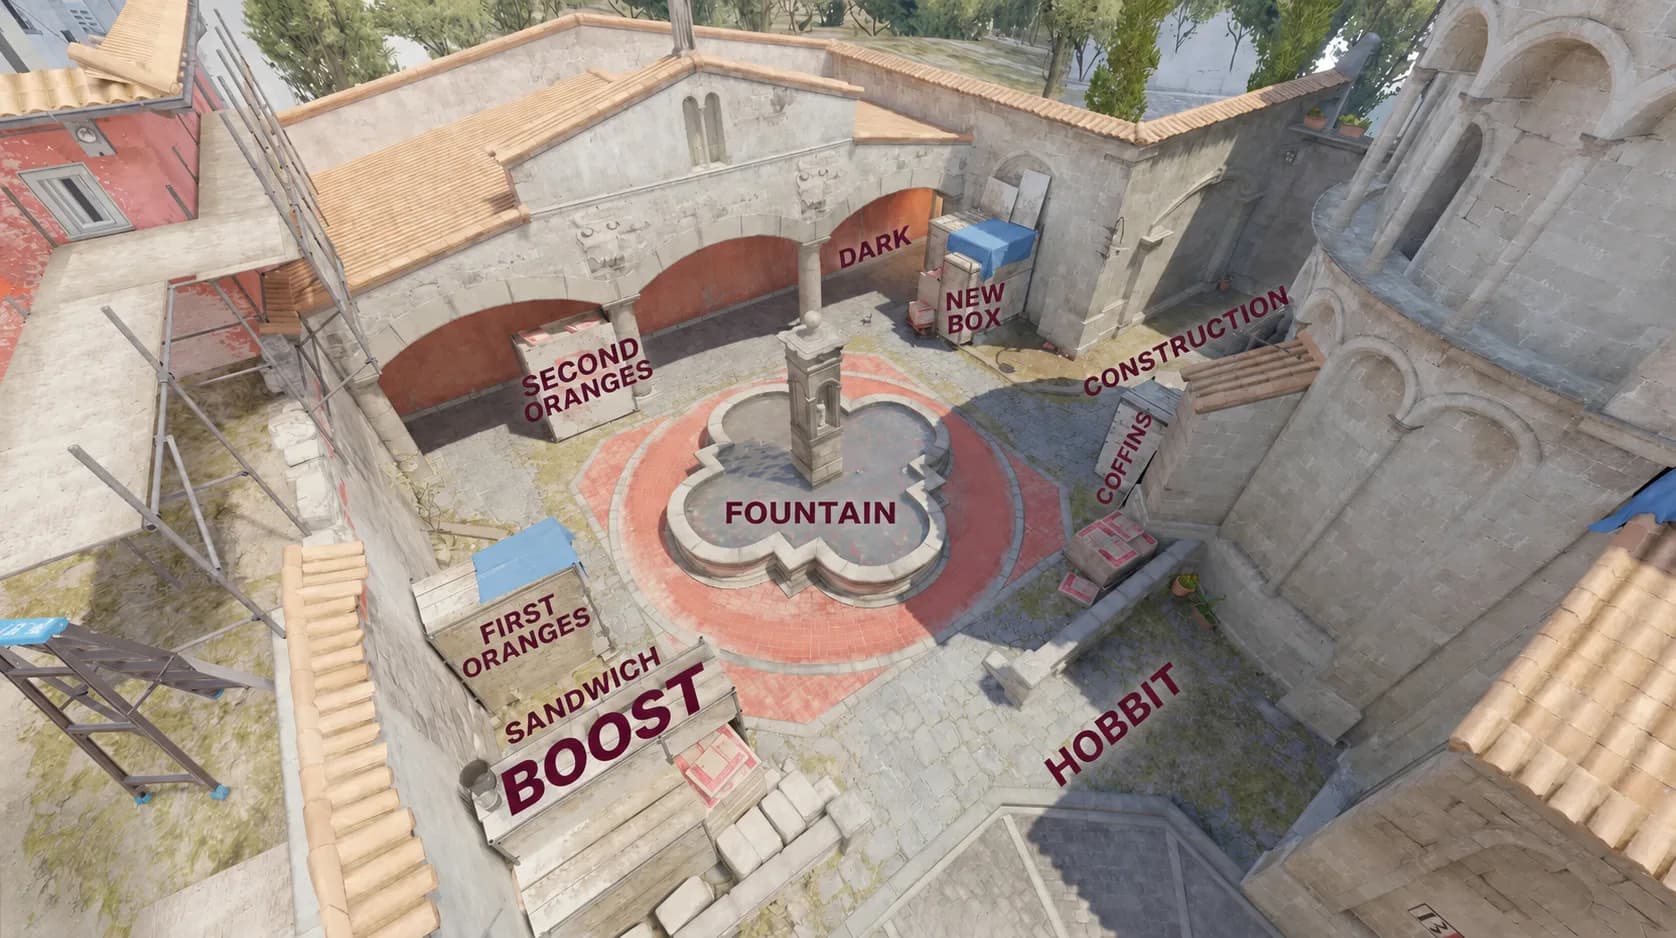
The Most Important B Positions
Banana is the main route to B. Control of this area determines how much information both teams have and how quickly the CT side can rotate.
Car is located near the lower part of Banana. It is commonly used as an early defensive position and utility reference point.
Sandbags can hide a defender during the fight for Banana. Terrorists should clear it with a Molotov or coordinated flashes before committing deeper.
Half Wall provides cover near the top of Banana. CT players can use it to throw utility, take an opening duel or fall back toward the site.
Coffins is one of the strongest positions for defending B. It offers cover from Banana and allows the player to move between several angles.
New Box is another powerful close position. A defender can surprise attackers entering the site, so the area is often cleared with a Molotov.
First Oranges and Second Oranges provide cover in the center and back of B. The names refer to the sets of barrels and boxes inside the site.
Construction, sometimes called Church, connects B with Ruins and CT. It is an important rotation route and a common position during retakes.
CT is the main connection between B and the rest of the map. Blocking it with smoke isolates the defenders already inside the bombsite.
Inferno Mid Callouts
Mid controls the pace of Inferno. It opens routes toward A, provides information about CT positioning and forces the defense to spend utility.
The essential Mid callouts are:
- T Ramp
- Mid
- Top Mid
- Second Mid
- Underpass
- Boiler
- Bridge
- T Apartments
- Mexico
- Alt Mid
T Ramp
T Ramp is the starting area from which Terrorists can move toward either Mid or Banana. Early utility thrown from this position often determines which areas the team will contest.
Mid
Mid is the central route toward A. Terrorists use it to pressure Top Mid, while CT players can gather information or slow the attack with smokes and grenades.
Top Mid
Top Mid gives attackers access to both Short and Long. Once this area is controlled, the CT side must prepare for several possible A splits.
Second Mid
Second Mid, also called Alt Mid, runs parallel to the main Mid route. It provides access to Apartments, Underpass and Boiler.
Underpass
Underpass connects Second Mid with Mid. It allows players to switch routes without returning to T Spawn and can create unexpected timing against aggressive CTs.
Boiler
Boiler is the small room connecting Apartments with Short. It is a common position for close-range fights and fast peeks toward Top Mid.
Bridge
Bridge connects the lower portion of Second Mid with T Apartments. Players can use it to move into Apartments or drop toward Underpass.
T Apartments
T Apartments leads toward Boiler and Balcony. Control of this area is essential for A executes that pressure Pit from multiple directions.
Teams to Study on Inferno
Team Vitality, G2, MOUZ, FURIA and The MongolZ are useful teams to study when learning high-level Inferno.
These teams regularly demonstrate:
- Coordinated Banana control
- Careful utility management
- Structured A splits
- Effective trading in narrow areas
- Patient late-round decision-making
- Strong retake protocols
AWP players can study how ZywOo and 910 approach narrow angles, opening duels and rotations between the bombsites.
Riflers can focus on players such as malbsMd and Spinx. Their demos show how to trade around Banana, pressure Apartments and create space without taking unnecessary risks.
How to Play Inferno on the CT Side
Inferno defense is built around space, timing and utility.
Aggressive solo peeks are rarely sustainable. CT players need positions that allow teammates to support each other and trade efficiently.
Control Banana Early
Banana is the most important area in many CT setups.
A team can send three players toward B at the beginning of the round to contest Banana with HE grenades, Molotovs and flashes. Once control has been established, one player can rotate back toward A.
The objective is not always to find an opening kill. Early Banana pressure can:
- Force the Terrorists to use utility
- Reveal how many players are nearby
- Delay a B execute
- Allow the B defenders to play from stronger positions
- Free an extra CT player to support A
Giving up Banana without collecting information leaves the defense vulnerable. CT players may be forced to keep two defenders on B for the entire round, weakening A.
Defend A Through Crossfires
A defenders should use positions that cover different entrances and allow immediate trades.
One player can defend from Pit while another watches Long, Moto or the site. If Apartments are controlled, the Pit player must avoid fighting Balcony and Short at the same time.
The defense should also track which areas have been lost. Once Terrorists control both Top Mid and Apartments, the A players need to prepare for a split rather than hold isolated angles.
Treat Utility as Time
A smoke on Inferno is more than visual cover. It can remove ten or more seconds from the attacking team’s clock.
CT players should avoid throwing every grenade at the first sign of pressure. A late smoke at Banana, Short or Apartments can stop an execute and force the Terrorists to attack with very little time remaining.
Molotovs deny close positions, flashes interrupt entries and HE grenades punish teams moving through narrow corridors.
Communicate Rotations Clearly
Inferno punishes unnecessary rotations.
Hearing utility at B does not automatically mean the attack is committed. The CT side should communicate:
- Number of opponents spotted
- Bomb location, if known
- Utility used by the attackers
- Areas that have been lost
- Whether a defender needs immediate support
One precise call can be more valuable than an opening kill because it prevents the entire defense from moving in the wrong direction.
How to Play Inferno on the T Side
T-side Inferno rewards patience and map control.
Fast rushes can work as occasional surprises, but repeating them allows the CT side to prepare with utility and close-range setups.
A structured attack usually follows three stages:
- Contest key areas.
- Force the CT side to spend utility.
- Execute after identifying the weaker bombsite.
Pressure Banana
Even when the final plan is an A execute, Banana pressure remains valuable.
Taking the area forces the defense to keep a player near B or spend utility to regain control. It also gives the Terrorists a safer route for a late rotation.
The team does not always need to push all the way to B Entrance. Reaching Car, Sandbags or Half Wall can be enough to create uncertainty.
Control Top Mid
Top Mid creates access to both sides of A.
Once the Terrorists control this area, the defense must respect:
- A Short pressure
- A Long pressure
- An Apartments split
- A late rotation back toward B
Top Mid should usually be taken with flashes and utility rather than a series of isolated dry peeks.
Use Apartments Carefully
Apartments provide a powerful route into A, but they also contain multiple close angles.
Players should clear Boiler, Halls, Balcony and close corners together. Entering one at a time gives defenders easy kills and removes the pressure that makes an Apartments split effective.
Track CT Utility
Inferno rounds are often decided by grenade economy.
If the B defenders have already used both smokes and their Molotovs, a late execute becomes much stronger. The same applies to A when the defenders no longer have utility for Short or Apartments.
Calling which grenades have been used allows the in-game leader to choose the correct timing for the final attack.
Essential Utility on Inferno
Inferno’s narrow routes make utility essential. Smokes, flashes and Molotovs allow teams to take space without walking directly into prepared angles.
Utility for an A Execute
A standard A execute should block the main defensive sightlines and force players out of Pit, Graveyard and other strong positions.
Useful grenades include:
- Moto or Library smoke
- Arch smoke
- Long smoke
- Pit Molotov
- Graveyard Molotov
- Balcony and site flashes
- HE grenades for common Pit positions
The exact combination depends on whether the team plans to enter through Short, Long or Apartments.
A good execute should isolate defenders. The attackers want to fight Pit, Site and Long separately instead of exposing themselves to every angle at once.
Utility for Mid Control
Mid utility helps the Terrorists reach Top Mid and creates the threat of an A split.
A basic setup can include:
- A smoke to block early CT vision
- Flashes above Mid
- A Molotov for close corners
- A Molotov or HE grenade toward Boiler
- Utility to pressure Short or Long
Even temporary Mid control forces the CT side to react. Defenders may use additional grenades, fall back toward A or rotate a player away from B.
Utility for a B Execute
A B execute is difficult without coordinated utility because defenders can hold the narrow entrance from several protected positions.
The most important grenades include:
- CT smoke
- Coffins smoke
- New Box Molotov
- First Oranges Molotov
- Second Oranges Molotov
- Flashes over B
- HE grenades for common anchor positions
CT and Coffins smokes isolate the bombsite from rotations. Molotovs remove the strongest close angles, while flashes allow the entry players to cross B Entrance.
Without these grenades, the attack often becomes a sequence of unfavorable duels against prepared defenders.
Effective T-Side Strategies
A Split Through Short and Long
This is one of the most reliable A executes.
The team takes Top Mid and divides into two groups. One attacks through Short while the other pressures Long and Arch.
Smokes can block Moto, Library or Arch, depending on the chosen route. Well-timed flashes prevent the Pit and site players from fighting both groups comfortably.
The two groups must enter together. If Long attacks too early, the CT side can eliminate that group before turning toward Short.
A Split Through Apartments
Part of the team attacks through Short while the Apartments players enter from Balcony.
This setup places heavy pressure on Pit. The defender must watch Short, Balcony and the site at the same time, which creates opportunities for trades.
The Apartments players should not jump from Balcony before the Short group is ready. Their role is to divide the defender’s attention and enter during the main contact.
Late B Execute
The attacking team establishes Banana control, waits for CT utility to expire and executes during the final portion of the round.
This strategy becomes particularly effective after the Terrorists have shown repeated pressure toward A. The CT side may begin rotating early, leaving B with only one defender.
The execute still requires proper utility. CT and Coffins must be blocked, while New Box and Oranges should be cleared before the bomb is planted.
Why Some Players Dislike Inferno
Inferno is one of the most tactical maps in CS2, which is also why it can feel frustrating.
Positioning Mistakes Are Punished Immediately
The map contains narrow corridors, close corners and short engagement distances. One unnecessary step can expose a player to multiple opponents.
Teamwork Is Essential
Individual aim has less impact when teammates do not trade, use utility or communicate. A disorganized team can lose control of the map before the final execute even begins.
Utility Requires Precision
A failed smoke or late flash can ruin an entire execute. Because the entrances are narrow, players cannot always compensate with mechanical skill.
CT Rotations Are Difficult
Rotating too early can leave a bombsite open. Rotating too late can make the retake almost impossible, particularly on B.
Retakes Are Expensive
Inferno bombsites contain several strong post-plant positions. A retake often requires multiple grenades, coordinated clearing and enough time to defuse the bomb.
Some professional teams have also treated Inferno as a near-permanent ban during extended periods. This shows how strongly the map rewards specific tactical systems and punishes teams whose style does not fit its structure.
How to Play Inferno More Effectively
Take Space With a Purpose
Control of Banana, Mid and Apartments is more valuable than random opening duels. Each area you control limits the opponent’s options and makes the round easier to read.
Communicate More Than the Enemy’s Location
A useful call should explain what is happening:
- Number of players spotted
- Direction of movement
- Utility used
- Bomb location
- Areas that are no longer controlled
“Three Banana, bomb spotted, one smoke used” gives the team far more information than simply saying “B.”
Define Every Player’s Role
Each player should know who is entering first, who throws utility, who trades and who watches the rotation.
Unclear roles are especially costly on Inferno because the entrances are narrow and players cannot easily move around one another.
Learn a Small Set of Reliable Grenades
You do not need to memorize every possible lineup immediately.
Start with:
- CT smoke for B
- Coffins smoke
- New Box Molotov
- Moto smoke for A
- Pit Molotov
- Basic Banana and Mid flashes
A small utility set that you can execute consistently is more valuable than dozens of lineups you cannot remember under pressure.
Adapt to the Opponent
Inferno is easy to read through timing patterns.
If the CT side constantly fights for Banana, wait for its utility and punish the next aggressive attempt. If the defenders play passively, take space and force them into difficult retakes.
Learn the Map, Then Read the Match
Learning the callouts improves communication. Understanding utility, rotations and map control allows you to see why a round develops in a particular way.
The same factors influence professional matches. A team’s Inferno performance depends on its map pool, recent form, player roles, side-specific results and ability to control Banana.
Winio analyzes these variables across thousands of matches to show what the data says before the server decides the result.
Explore upcoming CS2 matches and data-driven predictions at Winio.