
Mirage Callouts in CS2
One accurate smoke and two well-timed flashes can decide an entire round on Mirage.
Almost every Counter-Strike player knows the map, which leaves less room for surprise. Mechanical skill matters, but clear communication, utility usage and timing often matter even more. If your team cannot distinguish Connector from Jungle or Bench from Van, rotations quickly become slower and trades fall apart.
This guide covers the essential Mirage callouts, the map’s history, basic CT and T-side setups, key grenades and the mistakes players should avoid.
The History of Mirage
Mirage traces its origins to de_cpl_strike, a competitive map created by Michael “BubkeZ” Hull for the Cyberathlete Professional League.
After the CPL closed, the map was renamed Mirage and continued to develop within the Counter-Strike community. Valve officially added it to CS in 2013, updating its visuals while preserving the structure that had already made it a competitive classic.
Who wins?
All MatchesFree Today United21 Season 55
Tomorrow 13:30
 Elite Klan VELLAMOEternal Fire Academy
 Free for everyone · factor breakdown
Prediction: Elite Klan VELLAMO
73%27%United21 Season 55
Tomorrow 11:00
 GatorianTeletubisie
Prediction: Teletubisie
32%68%

Mirage has since become one of the most consistent maps in the professional pool. Its popularity comes from a familiar layout, multiple tactical options and a relatively balanced matchup between the two sides.
Recent map data puts the average round distribution at approximately:
- T side: 48.2%
- CT side: 51.8%
The difference is small enough that execution, economy and team coordination usually matter more than the side you start on.
Mirage A Site Callouts
A site contains several positions that appear in almost every Mirage match. Learning them makes executes, retakes and rotations much easier to coordinate.
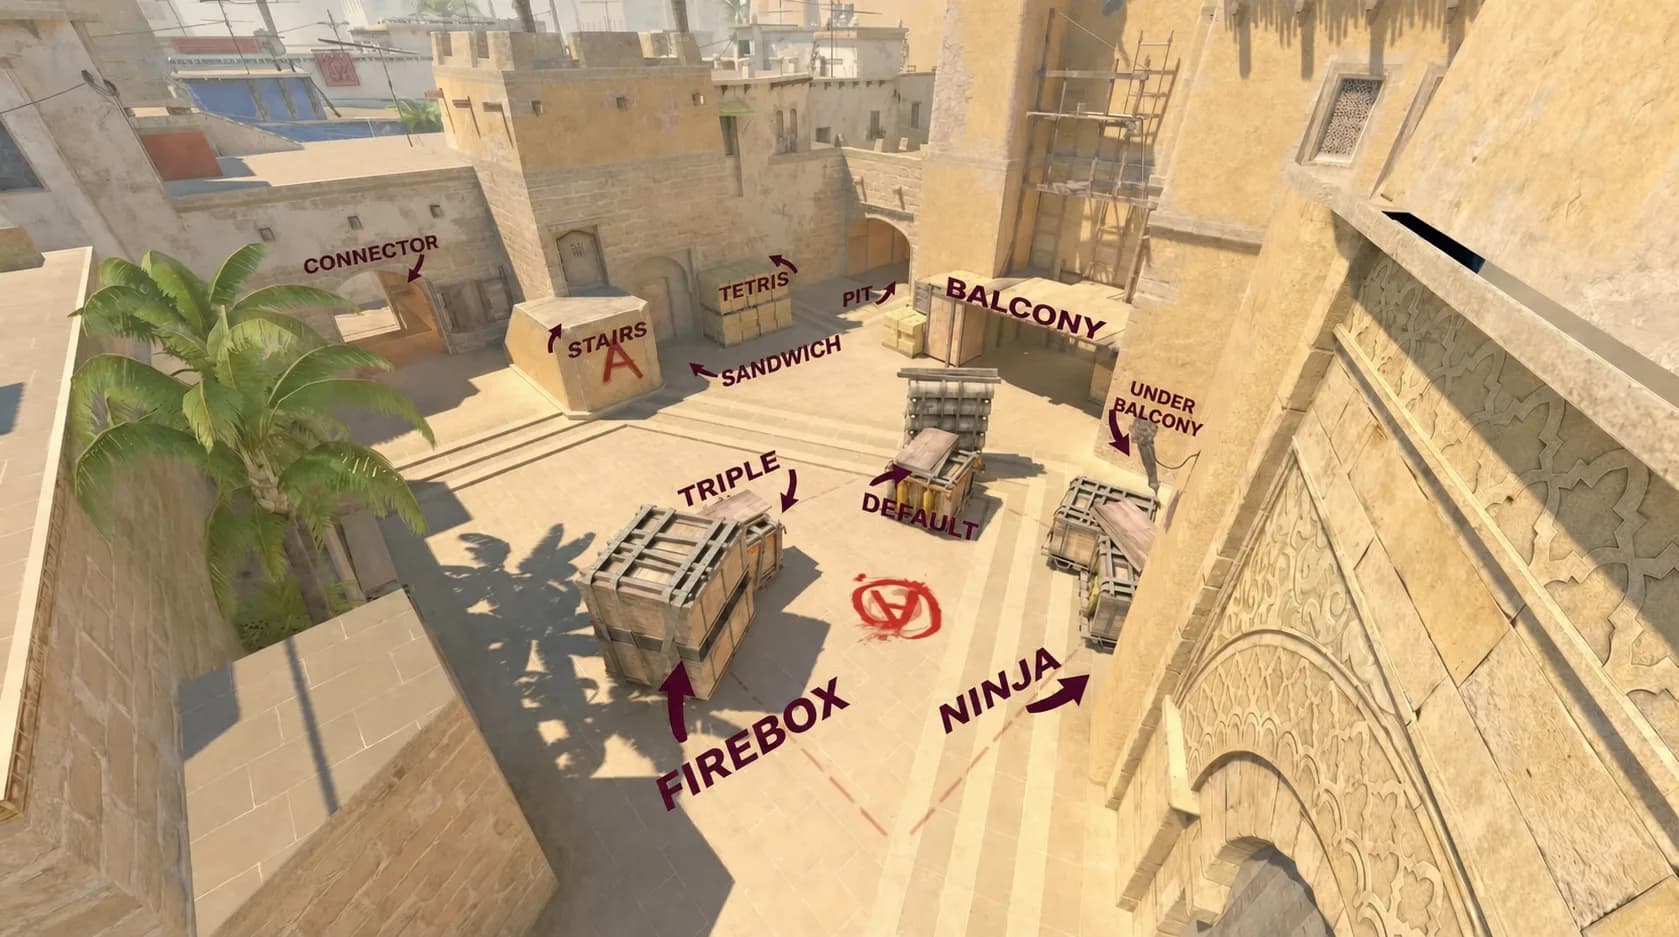
The main A site callouts are:
- A Ramp
- Palace
- Balcony
- Under Balcony
- Tetris
- Sandwich
- Stairs
- Jungle
- Connector
- Firebox
- Ninja
- Triple
- Default
- Ticket Booth
- CT
- Dark
- A Site
Some names can vary slightly between regions. For example, players may use Dark, Cubby or Under Palace for similar areas near the back of the site. What matters most is that everyone on the team uses the same terminology.
The Most Important A Positions
Tetris is one of the first positions Terrorists can reach from A Ramp. It provides cover during an execute but is vulnerable to grenades from Stairs, Jungle and CT.
Sandwich sits between Tetris and Stairs. It can be difficult to clear during a fast execute, which makes it a useful close-range position for CT players.
Jungle connects A site, Window and Connector. Losing Jungle gives the attacking team more control over rotations and post-plant situations.
Ticket Booth is a common defensive and retake position. It offers long sightlines across the site but can be isolated with a standard CT smoke.
Firebox and Ninja are close positions that can punish teams that enter the site without properly clearing corners.
Mirage B Site Callouts
B is more compact than A, so individual positioning and utility can have an even greater impact. A single defender can delay an entire execute if they use their grenades correctly.
The main B site callouts are:
- B Apartments
- Balcony
- Under Balcony
- Van
- Bench
- Default
- Back Site
- Pillar
- Short
- Catwalk
- Arches
- Market
- Market Window
- Market Door
- Kitchen
- Forest
- Edward
- Coldzera
- B Site
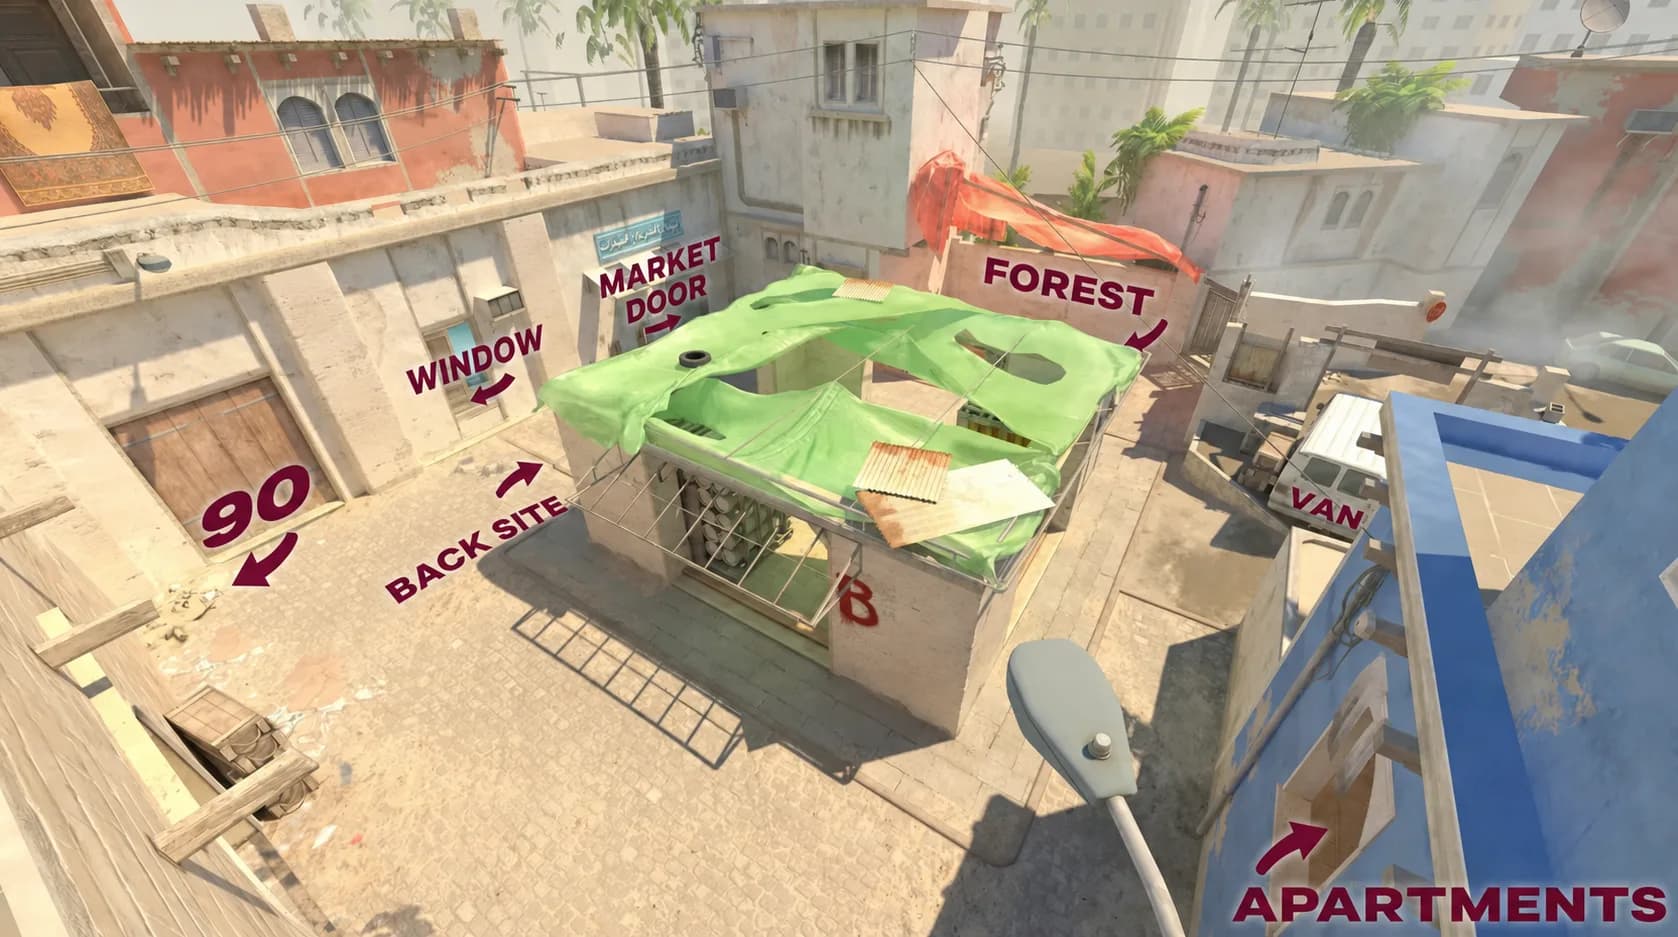
The Most Important B Positions
B Apartments is the main route used for direct B executes. CT players often throw an early Molotov or HE grenade to slow down the attack and collect information.
Van provides strong cover against players exiting Apartments, but it can be cleared with a Molotov and isolated by flashes.
Bench is a common position for anchors and post-plant players. It offers cover from both Apartments and Market, but becomes vulnerable once Short is controlled.
Market Window and Market Door are the main retake routes for CT players. Blocking both positions with smoke makes a B post-plant much easier to defend.
Short, also called Catwalk, links Mid to B. Control of this area allows the attacking team to split the site and pressure defenders from two directions.
Mirage Mid Callouts
Mid is the strategic center of Mirage. It connects both bombsites, provides information about rotations and opens several possible splits.
The essential Mid callouts are:
- Top Mid
- Mid
- Boxes
- Cart
- Chair
- Window
- Under Window
- Connector
- Underpass
- Short
- Catwalk
- Ladder Room
- Boost
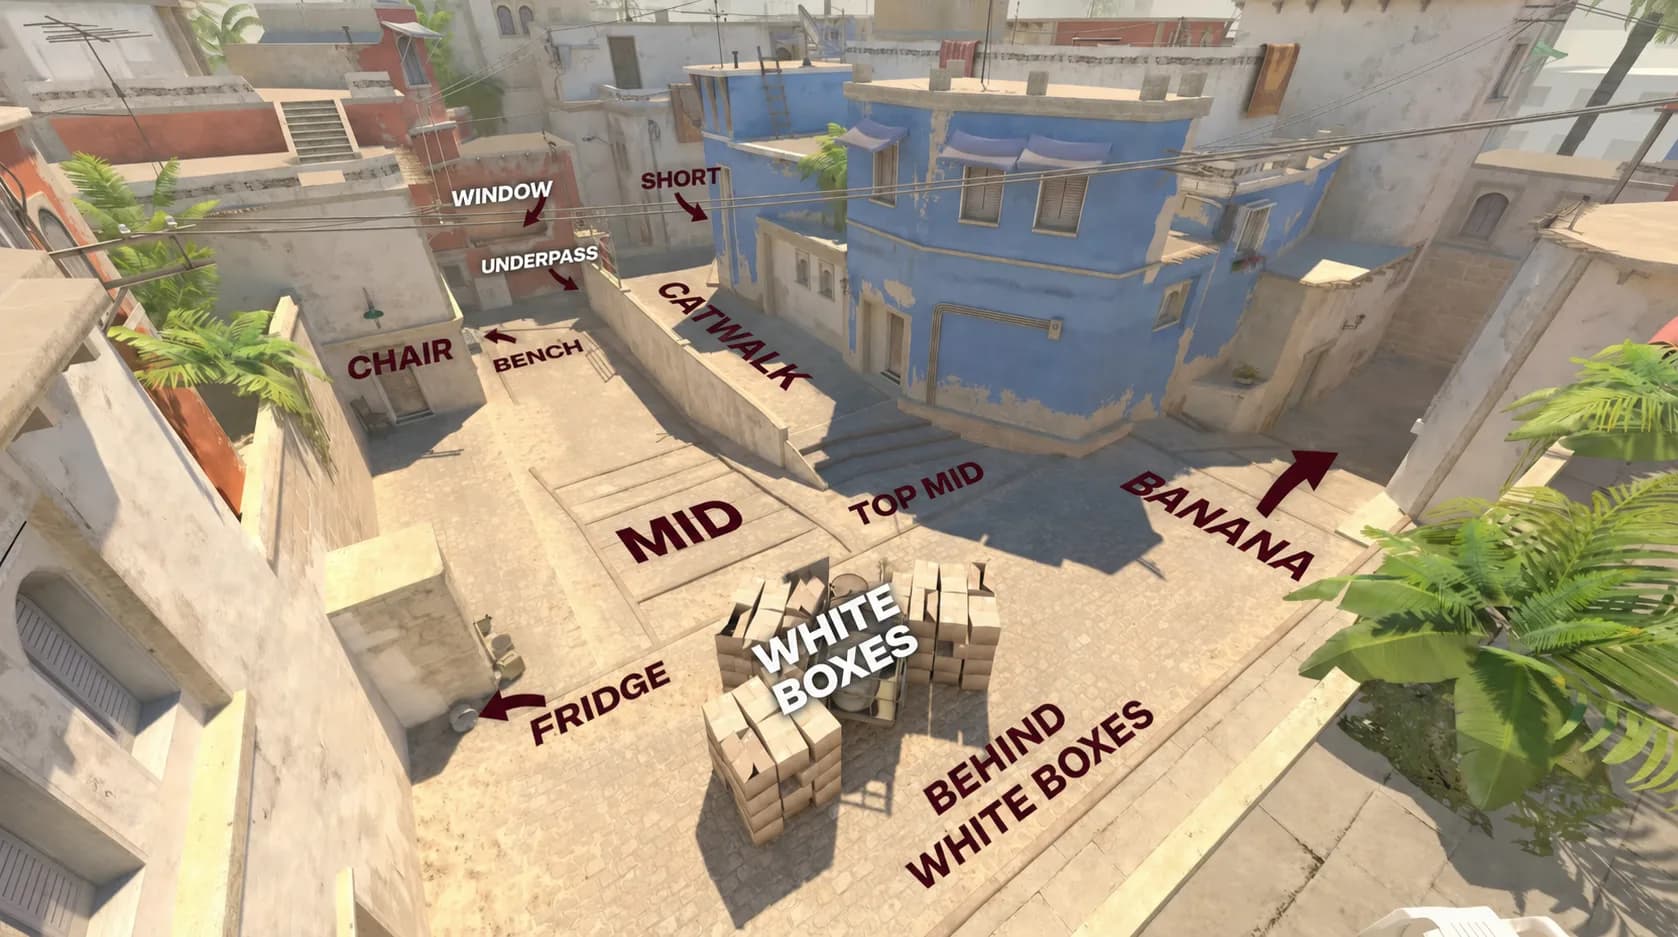
Clear Mid communication should include both the location and movement of the opponent. “One Mid” is rarely enough. “One under Window moving toward Connector” gives your teammates much more useful information.
Why Mid Control Matters
A Terrorist team with Mid control can attack:
- A through Connector
- B through Short
- Either site through a split
- The original bombsite after forcing CT rotations
Without Mid control, the attacking team usually has to commit through A Ramp, Palace or B Apartments. Those routes are easier for defenders to read and prepare for.
For CT players, Window is one of the map’s most valuable positions. It provides early information, supports Short and allows a fast rotation toward A through Jungle.
Teams to Watch on Mirage
Recent results have highlighted Team Spirit, PARIVISION, FaZe Clan, Team Vitality and B8 Esports as some of the strongest Mirage teams.
Their success comes from more than individual aim. These teams consistently combine:
- Early Mid pressure
- Coordinated utility
- Fast trading
- Controlled rotations
- Strong post-plant positioning
Watching professional demos is one of the fastest ways to understand the map.
AWP players can study how sh1ro and Jame use Window, Connector, Jungle and Ticket without exposing themselves unnecessarily. Riflers can focus on the positioning and timing of players such as Twistzz and flameZ around A and Mid.
How to Play Mirage on the CT Side
Two of the most common defensive setups are 3-1-1 and 2-1-2.
A 3-1-1 setup places additional resources around A. It is useful when the opponent frequently attacks through A Ramp and Palace or when your team expects an early execute.
The 2-1-2 setup is more balanced:
- Two players defend A
- One player controls Mid
- Two players defend B and Short
This structure gives the team more flexibility against defaults and fakes.
Defending A
The two A defenders should play positions that allow them to trade.
One player can cover Palace and the closer parts of the site from Stairs or under Balcony. The second can play around Default, Triple, Ticket or CT to cover A Ramp and the deeper site angles.
The goal is not simply to survive. The defenders should take the first favorable fight, delay the plant and avoid giving the site away without a trade.
Defending B
The B anchor should prioritize time over highlight plays.
Most B executes involve several Terrorists entering Apartments together. Taking the first duel without support can give the attacking team a free opening kill.
A stronger sequence is:
- Use a Molotov or HE grenade to slow the push.
- Flash the Apartments exit.
- Fall back toward Bench, Back Site or Forest.
- Wait for support from Short or Market.
- Fight with a teammate and secure the trade.
Playing AWP on Mirage
The AWP is one of the most important tools for controlling the pace of Mirage.
Window and Connector provide early information and opening-duel opportunities. However, the AWPer should not stay in one position every round. Repeating the same angle makes it easier for the opponent to prepare a smoke, flash or prefire.
The best Mirage AWPers know when to challenge Mid, when to rotate toward Ticket or Jungle and when to save the weapon for a retake.
How to Play Mirage on the T Side
T-side Mirage usually revolves around three types of rounds:
- Defaults
- Splits
- Fakes
Combining them forces the CT side to constantly question where the final attack will happen.
Standard A Execute
A basic A execute normally uses three smokes:
- Stairs smoke
- Jungle smoke
- CT smoke
Molotovs can then clear positions such as Under Balcony, Sandwich and Firebox. Flashes above the site help players cross from A Ramp and Palace without taking several clean duels at once.
This setup creates a safer entry and a much clearer post-plant.
Standard B Execute
A B execute should isolate the defenders and block the main retake routes.
Useful grenades include:
- Short smoke
- Market Window smoke
- Market Door smoke
- Molotov for Van
- Molotov for Bench or Back Site
- Flashes over Apartments
Once Market and Short are blocked, the B anchor becomes isolated. The attacking team can then clear the site together and prepare for the retake.
Split Executes
A split attacks the same bombsite from multiple directions.
For an A split, part of the team enters through A Ramp or Palace while the Mid players move through Connector.
For a B split, the Apartments players attack the front of the site while the Mid group moves through Short.
Splits only work consistently when the team has already secured Mid. Without that control, players arrive from different directions at different times and cannot trade effectively.
Using Fakes
Mirage offers several opportunities for convincing fakes.
A team can throw the standard Stairs, Jungle and CT smokes from the B side of the map. This utility often forces CT players to rotate toward A, creating space for a delayed B execute or a move through Mid.
The fake becomes stronger if one player adds pressure from A Ramp or Palace while the rest of the team waits for rotations.
Winio in Numbers
Every Winio prediction is built using team form, match history, player statistics, map pools, the current meta and dozens of additional variables.
- Up to 89% model accuracy
- More than 80 analytical factors
- Over 4,000 matches processed every month
Key Grenades on Mirage
Essential T-Side Utility
- Window smoke from T Spawn
Blocks the CT AWPer’s early Mid vision and allows Terrorists to contest Top Mid more safely.
- Stairs and Jungle smokes
Remove two of the most dangerous defensive angles during an A execute and reduce the number of simultaneous fights attackers must take.
- CT smoke
Cuts off Ticket and CT Spawn, allowing the attacking team to enter A and establish a post-plant before the rotation arrives.
- Market Window and Door smokes
Isolate the B anchor and make it much harder for CT players to start an immediate retake.
- Van Molotov
Forces a defender away from one of the strongest positions against an Apartments push.
Essential CT-Side Utility
- A Ramp and Palace flashes
Disrupt an A execute and create opportunities for defenders to take favorable fights from Stairs, Ticket or under Balcony.
- B Apartments Molotov
Stops or delays an early B rush and gives the anchor time to call for a rotation.
- Tetris HE grenade
Deals significant damage to attackers taking early control after leaving A Ramp.
- Top Mid smoke
Slows down T-side Mid control and makes it harder for the attackers to reach Connector or Short without spending additional utility.
Learn the Map, Then Read the Match
Knowing the callouts helps you communicate. Understanding the rotations, utility and map control helps you read the game itself.
The same details also matter at the professional level. Map pools, team tendencies, player form and side-specific performance can completely change the probability of a matchup.
Winio analyzes these factors across thousands of matches to show what the numbers say before the server decides the result.
Explore upcoming CS2 matches and data-driven predictions at Winio.